

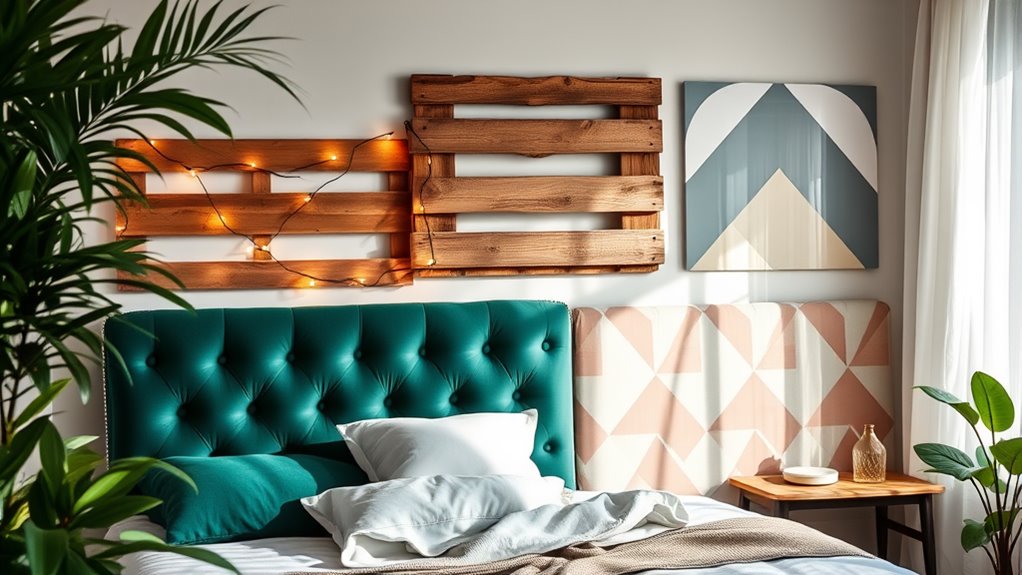
If you're looking to refresh your bedroom, consider stylish DIY headboard ideas like a tufted fabric headboard for comfort or a rustic pallet wood headboard for a cozy vibe. Geometric wooden designs add a modern touch, whereas a woven bamboo headboard brings in natural warmth. For a unique flair, try a vintage ladder or a macramé wall hanging. Get creative with floating shelves for functional decor. There's plenty more inspiration to explore!
Upholstered Fabric Headboard
If you want to add a touch of elegance to your bedroom, an upholstered fabric headboard is a fantastic choice. It not only enhances the aesthetic but additionally offers comfort and style. You can explore a variety of upholstered color choices that suit your personality and decor. Whether you prefer soothing neutrals or lively hues, the right color can transform your space.
Moreover, fabric texture options play an essential role in the overall design. Consider rich velvet for a luxurious feel or linen for a more casual vibe. Mixing textures can create visual interest and depth, making your headboard a true focal point.
Don't hesitate to experiment with patterns, too. Geometric prints or floral designs can add flair as they complement your existing decor. In the end, an upholstered fabric headboard is a versatile and innovative way to refresh your bedroom and express your unique style.
Rustic Pallet Wood Headboard
A rustic pallet wood headboard adds a charming, homemade touch to your bedroom. This innovative project not only gives your space a cozy vibe but also showcases your creativity. By using reclaimed pallet wood, you're embracing sustainable decor as well as achieving that perfect rustic look.
To start, gather a few pallets, ensuring they're in good condition. After dismantling them, sand the wood to eliminate rough edges and splinters. You can choose to leave the wood natural for an organic feel or stain it for a richer hue.
Once you've prepared the wood, attach the planks together, creating your desired size. Secure it to the wall or your bed frame for stability. This DIY headboard is not just functional; it's a statement piece that enhances your rustic decor. You'll love how easy it is to transform your bedroom with this stylish, personalized touch.
Geometric Wooden Headboard
Geometric wooden headboards bring a modern flair to your bedroom, effortlessly blending style and simplicity. These striking pieces can transform your space with their bold designs and clean lines. By incorporating geometric patterns, you create a focal point that draws the eye and adds visual interest to your room.
You can easily customize your headboard using different wooden finishes, allowing for a unique touch that reflects your personal style. Whether you prefer a minimalist look with subtle shapes or a more intricate design, the options are endless.
To start your DIY project, gather plywood or reclaimed wood, then sketch out your desired geometric pattern. Cut the pieces to size and assemble them to create a stunning headboard that showcases your craftsmanship. With a little creativity, you'll have a one-of-a-kind piece that not only enhances your bedroom's aesthetic but also makes a bold statement.
Reclaimed Door Headboard
Reclaimed door headboards add a unique touch to your bedroom, showcasing history and character in a stylish way. By using reclaimed wood, you're not just giving a second life to vintage finds; you're additionally contributing to sustainability. Envision transforming an old door into a stunning focal point that tells a story. With a bit of creativity, you can sand down the surface to highlight its natural grain or leave it as-is for an authentic, rustic vibe.
To create your headboard, simply hinge the door to the wall or mount it directly behind your bed. Consider mixing different styles of doors for an eclectic look that reflects your personality. You can even paint or stain the wood to match your existing decor. Embrace innovation and individuality with a reclaimed door headboard that's not just functional but furthermore a work of art in your bedroom retreat.
Woven Bamboo Headboard
If you're looking to add a natural aesthetic to your bedroom, a woven bamboo headboard is a fantastic option. It's not just visually appealing; you can create it using simple crafting techniques that make it accessible for any DIY enthusiast. Let's explore how you can bring this unique element into your space.
Natural Aesthetic Appeal
A woven bamboo headboard brings a touch of nature into your bedroom, infusing the space with warmth and tranquility. Using natural materials like bamboo not only improves aesthetic appeal but additionally contributes to sustainable design. This eco-friendly choice reflects your commitment to innovation and environmental responsibility. The intricate patterns and earthy tones of bamboo create a serene atmosphere, inviting relaxation and comfort. Plus, bamboo's durability guarantees that your stylish headboard stands the test of time. You can easily customize it to fit your personal style, whether you prefer a minimalist look or something more bohemian. Embrace the natural beauty of bamboo, and transform your bedroom into a chic retreat that celebrates both style and sustainability.
Simple Crafting Techniques
Creating a woven bamboo headboard can be a straightforward and rewarding project that adds a unique touch to your bedroom. With minimalist designs in mind, you can easily craft this stunning piece using basic crafting tools. Here's a simple overview of the materials and steps:
| Materials | Steps |
|---|---|
| Bamboo strips | 1. Measure your space. |
| Wood frame | 2. Cut bamboo to size. |
| Wood glue | 3. Attach bamboo strips. |
| Sandpaper | 4. Smooth edges. |
| Stain or finish | 5. Apply finish. |
This project not only improves your space but also showcases your creativity. Embrace this innovative approach to raise your bedroom décor!
Painted Accent Wall Headboard
Though many headboards can be bulky and expensive, a painted accent wall offers a sleek and creative alternative that transforms your bedroom effortlessly. By choosing a bold paint color, you can set the mood and define your space, making it feel unique and stylish. Think beyond solid shades; consider striking wall patterns like stripes, geometric shapes, or even a mural that reflects your personality.
Start by selecting a paint color that complements your existing decor as well as adding a pop of interest. Use painter's tape to create crisp lines and patterns, ensuring a professional finish. This DIY approach allows you to experiment with textures and layering, giving depth to your design.
With a painted accent wall headboard, you'll not just save space and money, but you'll create a stunning focal point that draws the eye and enhances your bedroom's aesthetic. Get creative and let your walls speak!
Vintage Ladder Headboard
If you're looking for a unique touch in your bedroom, a vintage ladder headboard could be just what you need. You'll want to start by sourcing the perfect ladder, then gather some assembly tips to get it securely in place. Finally, think about styling and finishing touches to make it truly your own.
Sourcing Vintage Ladders
Finding the perfect vintage ladder for your headboard project can be an exciting treasure hunt. Start by exploring vintage markets in your area; you never know what hidden gems you might uncover. Look for ladders with character—those with unique finishes, intriguing shapes, or even a little wear and tear. Once you find your ideal ladder, consider its restoration potential. A simple sanding and a fresh coat of paint can transform a worn piece into a stunning focal point. Don't forget to check online marketplaces or thrift stores, where you might stumble upon an unexpected find. Sourcing the right ladder not just enhances your headboard design but also adds a touch of personality to your bedroom refresh.
Assembly and Installation Tips
Once you've sourced the perfect vintage ladder, it's time to bring your headboard vision to life. Follow these crucial tips for a seamless assembly and installation:
- Select the Right Height: Verify your ladder's height complements your mattress for ideal headboard placement.
- Gather Installation Tools: You'll need wall anchors, a drill, and screws to secure your ladder firmly to the wall.
- Assess Stability: Before finalizing, check the ladder's stability against your bed frame to avoid wobbling.
Once everything's aligned, secure the ladder to the wall using the installation tools. This innovative approach not only adds character to your bedroom but additionally creates a unique focal point. Enjoy your stylish new headboard!
Styling and Finishing Touches
As you embrace your vintage ladder headboard, consider how to style it to reflect your personality and improve your bedroom's ambiance. Start by incorporating color coordination; choose bedding and pillows that harmonize with the ladder's wood tones. Soft, muted colors can create a calming atmosphere, whereas bold hues can add a striking contrast.
Next, focus on texture layering. Use a variety of fabrics—think plush throw blankets, chunky knits, or smooth linens—to bring depth and interest to your space. You might additionally hang decorative elements or fairy lights from the ladder to enrich its charm. This approach not merely highlights your vintage find but transforms your bedroom into a uniquely stylish retreat that feels inviting and personalized.
Cork Board Headboard
Transform your bedroom with a creative cork board headboard that adds both style and functionality. This innovative design not only serves as a stunning focal point but additionally offers practical cork board benefits that improve your space. Here's how you can make it uniquely yours:
- Personalized Art Display: Pin up your favorite photos, artwork, or inspirational quotes to create a playful gallery.
- Color Coordination: Choose cork board customization options that match your decor—paint it, use patterned fabric, or add decorative trims.
- Organizational Tool: Use it to keep reminders, schedules, or notes handy, making your bedroom a more organized retreat.
With its versatility, a cork board headboard is perfect for those who crave innovation and want to express their personality. Get ready to boost your bedroom's style while enjoying the practical advantages of this unique headboard option!
Macramé Wall Hanging Headboard
If you're looking to add a touch of bohemian flair to your bedroom, a macramé wall hanging headboard can be the perfect solution. This innovative design approach lets you personalize your space during showcasing your creativity. By using various macramé techniques, like square knots and half-hitches, you can craft a stunning focal point behind your bed.
Choose wall hanging materials that resonate with your style—think natural cotton rope, jute, or even colorful yarn for a unique twist. You can even experiment with different textures and thicknesses to create depth.
Once you've mastered the knots, hang your masterpiece at the desired height for an effortless, chic look. Not only does this headboard provide a soft backdrop for your bedding, but it as well infuses your room with warmth and character. So grab your supplies, and let your imagination run wild with this stylish DIY project!
Tufted Headboard With Buttons
Creating a tufted headboard with buttons can transform your bedroom into a stylish retreat. You'll need a few specific materials and a clear step-by-step assembly guide to make the process smooth. Let's gather what you need and get started on this chic DIY project!
Materials Needed for Tufting
To achieve a stunning tufted headboard with buttons, you'll need a few vital materials that will guarantee both functionality and style. With the right tufting materials, you can boost your bedroom's aesthetic and make a bold statement. Here are three fundamental items to kickstart your project:
- Upholstery Fabric: Choose a durable and stylish fabric that complements your decor.
- Foam Padding: Opt for high-density foam to provide comfort and support.
- Buttons: Pick decorative buttons that improve your tufting techniques and add visual interest.
Gathering these materials will set the foundation for your innovative tufted headboard. With the right tools, you're ready to create a stunning centerpiece that reflects your unique style!
Step-by-Step Assembly Guide
Assembling your tufted headboard with buttons involves a few straightforward steps that will transform your bedroom. First, cut your plywood to the desired size, then attach the foam and batting for that plush look. Next, use your chosen fabric to cover the surface, ensuring it's tight and smooth. For innovative headboard styles, consider using a staple gun to secure the fabric in place.
Now, mark where you want your buttons, and use a needle and thread to tuft the fabric, pulling it tight for that luxurious finish. Finally, attach the headboard to your wall or bed frame using appropriate installation techniques for stability. Enjoy your new stylish focal point that improves your space!
Floating Shelves Headboard
A floating shelves headboard adds a modern touch to your bedroom during providing functional storage. With innovative floating shelf designs, you can uplift your space and showcase your personal style. Here's how to make it work for you:
- Choose Your Shelves: Select shelves that complement your decor—think sleek wood or minimalist metal.
- Incorporate Lighting: Add LED strip lights or stylish lamps to improve your shelf styling and create a cozy ambiance.
- Curate Your Display: Use decorative items, books, or plants to personalize your headboard and make it a focal point.
Canvas Art Headboard
When you want to make a bold statement in your bedroom, a canvas art headboard can transform your space into a personal gallery. Using various canvas painting techniques, you can create a unique design that reflects your personality. Whether you opt for abstract art, a serene scenery, or bold geometric patterns, the options are endless.
Start by choosing your canvas fabric choices; cotton or linen work well for painting and provide a beautiful texture. Measure the desired dimensions of your headboard, then stretch the fabric over a wooden frame or a large canvas board.
Once you've secured it in place, release your creativity with paint, stencils, or even fabric dyes. This DIY project not only adds color to your bedroom but also allows you to showcase your artistic flair. With a canvas art headboard, your bedroom becomes a stylish, innovative retreat.
Frequently Asked Questions
What Tools Do I Need for Building a DIY Headboard?
To build your DIY headboard, you'll need some crucial tools. Gather a saw, drill, hammer, and measuring tape. Depending on your design inspiration, wood materials like plywood or reclaimed wood can add character. Don't forget screws and sandpaper for finishing touches. A level guarantees your headboard's straight, as you add fabric with a staple gun. With these tools, you'll create a stylish focal point for your bedroom that reflects your unique style!
How Much Does a DIY Headboard Typically Cost?
A DIY headboard typically costs between $50 and $200, depending on your budget considerations and material choices. Don't let initial costs scare you off; crafting your own can save you money as you let your creativity shine! You can opt for reclaimed wood, fabric, or even foam, allowing you to innovate without breaking the bank. Plus, you'll end up with a unique piece that perfectly reflects your style and fits your space.
Can I Customize the Size of My Headboard?
Absolutely, you can customize the size of your headboard! By choosing your preferred dimensions, you'll create a piece that fits your space perfectly. Consider various headboard materials like wood, fabric, or metal to improve its style. With these customization options, you can experiment with shapes and heights, making it truly unique. Don't hesitate to get creative—this is your chance to reflect your personal taste in your bedroom design!
How Do I Secure My Headboard to the Wall?
How do you keep your headboard from wobbling? First, choose sturdy headboard materials like plywood or solid wood for stability. Then, use wall anchors to secure it firmly to the wall. Measure carefully to align it perfectly with your bed frame, and drill holes for the anchors. Once it's in place, you'll enjoy a stylish, secure addition to your bedroom without any worries about it shifting or falling over.
Are DIY Headboards Easy to Disassemble and Move?
Yes, DIY headboards can be easy to disassemble and move, especially if you choose a removable design. When you build your headboard, consider portability options like lightweight materials or a modular structure. This way, you can easily take it apart and transport it when needed. Plus, you'll enjoy the flexibility to refresh your space without much hassle. Embrace innovation in your design to make moving a breeze!